Wednesday, February 25, 2015

The Childrens Ska

Terbaru buat temen-temen pecinta musik SKA , khususnya anak-anak Bumiayu , Tegal , Ajibarang , Purwokerto dan sekitarnya.

tentu sudah tidak asing lagi dengan nama The Childrensska , 

yups,,
The Childrensska adalah group musik ska asli bumiayu .

kehadiran mereka tentu memberi warna baru bagi belantika musik tanah air , khususnya musik Ska.


baru-baru ini The Childrensska telah merilis single pertama mereka , bertajub tema cinta , di bawakan dengan lyric yang sederhana dan balutan serta sentuhan musik yang mempesona , 

bikin merinding siapapun yang mendengarnya .
oke ,,
langsung aja download lagunya di 

Childrensska - I see.mp3

Friday, February 6, 2015

Update Redmi Note 4G-Global To Version KHIMIBH 22.0


image
The latest stable ROM for Redmi Note 4G Global version is ready for manual update by users.
The zip file is named as version: KHIMIBH22.0 (KitKat).
image
Instead of using the native Mi Updater app, the following ROM flashing method is via the TWRP Recovery tool. Reasons:
~ if you have already Rooted your device and installed the TWRP Recovery rom.
~ in the update process, you don’t have to rename the new version zip file to “update.zip”.
You can GOTO the MIUI Roms site to download the correct version of this update (as above) and then move the zip file from Download directory to Internal Storage root.
image
From there, power off the device and start the ball rolling by reboot into TWRP Recovery.
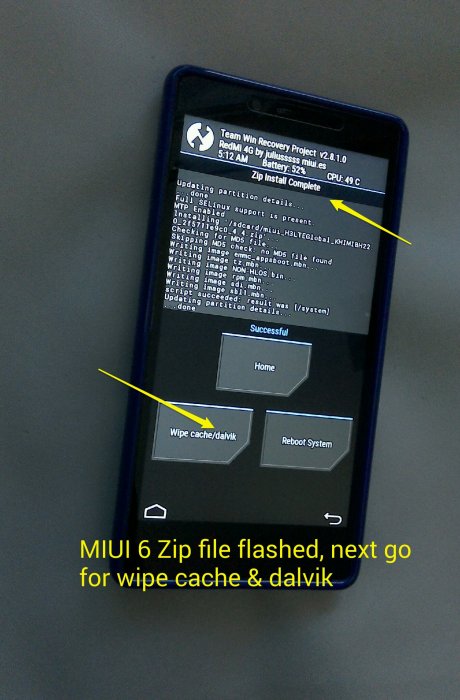
INSIDE TWRP, start installing the update rom zip file (KHIMIBH22.0).
image
After installing of update ROM successfully, wipe Cache & Dalvik. You may also skip that and go straight into Reboot System. And it is done. But it is suggested that you wipe Cache & Dalvik to double ensure that after reboot system everything (apps and device system) works fine, as I did.
image
image
If you choose to wipe Cache & Dalvik before reboot system, you will need to manually reboot system using power button later.
image
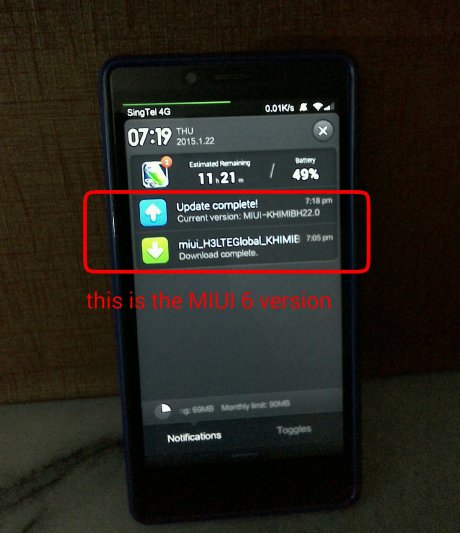
Upon successful reboot system, your device will show the update complete notification. This is a good sign.
image
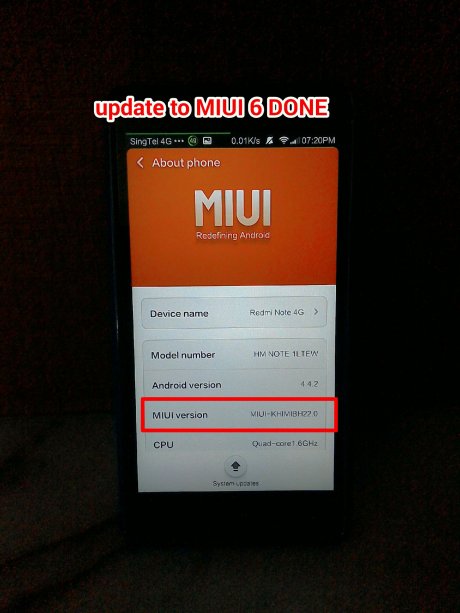
Go to the Setting ~ About Phone to further confirm that you have got the real stuff installed.
image
BUT, IF YOU CHECK ON THE ROOT CHECKER APP, YOU WILL NOTICE THAT YOUR DEVICE IS UNROOTED Again, because the earlier root status will be overwritten by the new MIUI update.
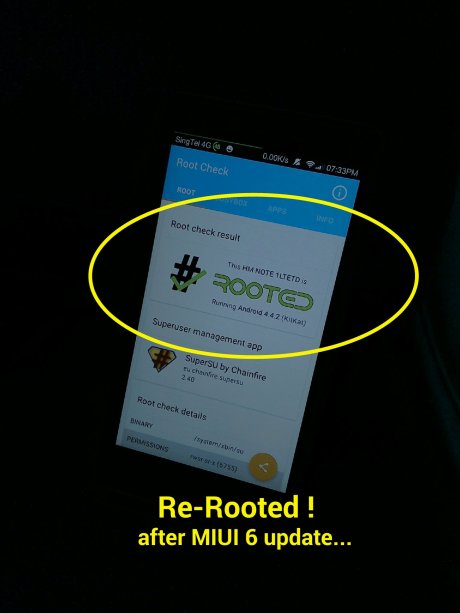
You may choose to remain unrooted state after this rom update. If not, you can re -root the device again…
No worry. Just recall your earlier MIUI_Root zip file from your storage, make sure the zip file remains as update.zip; you can use the native system app Updater to go through the native rooting process again and, you will get back the Root status without any problem. (Now you would understand why I prefer to use custom recovery tool for flashing new ROM version/update, instead of native way through the system Updater.)
image
image
After re-rooted your Redmi Note 4G, you need to activate SuperSU app in order to update its binary, for apps requesting root permission.
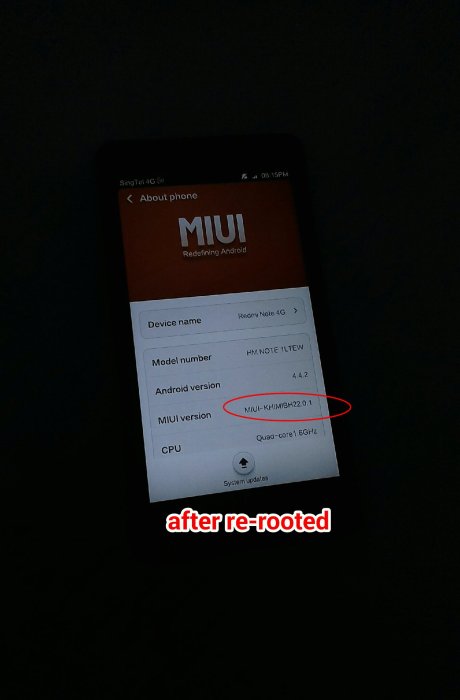
You will get another notification to inform you that your MIUI version is changed to, KHIMIBH22.0.1 representing that the most current version been installed is now a rooted version.
image
Go to the Setting ~ About Phone, you will also see the updated information.
image
When all done, you can move the big file (KHIMIBH22.0) from internal storage to your Ext. sdcard for safe storage and hence, free up more space in the internal storage memory.
image
Below: Latest Redmi Note wallpaper
image
Conclusion:
This new update to version KHIMIBH 22.0 has been done using TWRP Recovery tool with ease. For those who are rooted with CWM Recovery I believe it will be as smooth.
So if your are rooted, is best to install a custom recovery rom for such purposes.
I have checked on the apps installed previously, all app data are in tag and apps run smoothly. No problem encountered. All Google apps and including FM radio, wifi, Bluetooth, games  and Google Launcher etc. run along well on this updated stable Rom.
As to battery life on this updated rom, it will take some time to test it out. I think it won’t be too affected, probably with improvement as this update will solve some previous bugs.


sumber : sumber DI SINI

Tuesday, February 3, 2015

Cara Menonaktifkan System Beep di Windows 7


Munculnya banyak speaker dan sound system yang berkembang pesat di dunia komputer membuat system beep menjadi kurang populer. Jika kita pernah mencicipi komputer jadul yang untuk bisa mengeluarkan suara musik saja harus memasang sound card sendiri, maka system beep menjadi penting untuk “menyuarakan” pesan dari komputer dari apa yang sedang terjadi.
Windows 7 masih memiliki fitur ini dan kita bisa menonaktifkan system beep tersebut jika dirasa mengganggu kita dalam menggunakan komputer. Setidaknya ada 4 cara yang bisa dilakukan untuk menonaktifkan system beep di Windows 7.

Menonaktifkan melalui Control Panel

Buka Control panel dan navigasikan menuju Hardware and Sound > Sound > Change System Sound.


Control Panel
Setelah terbuka window Sound, pilihlah tab sounds dan carilah Default Beep pada bagian Program Events. Setelah itu pilih dan tentukan pengaturan sounds yang ada di bawahnya menjadi none.


Default Beep
Klik OK atau Apply untuk mengakhiri konfigurasi.

Menonaktifkan melalui Command Prompt

Cara lain untuk mematikan system beep di Windows 7 adalah menggunakan command prompt atau cmd. Buka command prompt melalui Start menu dan jalankan perintah ini satu per satu.
1
2
3
net stop beep
 
sc config beep start= disabled
Tekan enter setiap menjalankan satu perintah.


Command Prompt Disabled Beep
Tapi kita juga bisa menonaktifkan system beep untuk sementara hingga booting selanjutnya dengan cukup menggunakan perintah ke dua pada command prompt di atas.

Menonaktifkan melalui registry editor

Melakukan tweaking system melalui registry editor memang beresiko mengganggu stabilitas sistem  sehingga kita perlu berhati-hati dalam memperlakukannya. Jika Anda terlalu takut menggunakan cara ini dapat mengganggu sistem Anda, maka masih ada opsi lain yang bisa digunakan.
Buka registry editor dengan mengetikkan regedit di Start menu lalu bukalah path ini:
HKEY_CURRENT_USER\Control Panel\Sound


Regedit Beep
Pada panel sebelah kanan di window registry editor, pilih Beep lalu double klik untuk merubah nilai registrinya. Ubah value data yang awalnya yes menjadi no, lalu klik OK untuk mengakhiri perubahan.

Menonaktifkan melalui Device Manager

Device Manager dapat diakses melalui klik kanan pada icon Computer di Windows Explorer lalu pilih Manage.


Start Device Manager
Ketika window Computer Management telah terbuka, pilih Device Manager. System Beep secara default tidak terlihat sehingga kita perlu menampilkannya melalui menu bar view > show hidden device, kemudian periksa bagian Non Plug and Play Drivers.


Device Manager View
Lakukan breakdown pada bagian Non Plug and Play Drivers dan pilih Beep dengan melakukan double klik. Akan muncul window Beep properties lalu navigasikan ke tab Driver, ganti Startup type menjadi Disabled. Pilih OK untuk mengakhiri konfigurasi.


Beep Properties

Penutup

Cara-cara tersebut akan menonaktifkan system beep Windows 7 kita. Apabila suatu saat kita menginginkan untuk mengaktifkan system beep kembali, cukup gunakan beberapa cara di atas dengan mengganti beberapa parameter untuk mengaktifkannya. Jangan lupa buatlah restore points untuk berjaga-jaga, dan semoga bermanfaat.


SUMBER : KLIK DI SINI